In this article, we will introduce to you the navigation architecture component. If you are wondering how Android answer to iOS Storyboards, read the text!
Table of Contents:
Android Jetpack
Android Jetpack is the newly created set of libraries and tools that were presented on the latest Google I/O event in 2018. With the vast increase of libraries released, Google recently came up with the idea to combine the old and new ones and organize those into 4 categories: Foundation, Architecture, Behaviour and UI. The aim of the Android Jetpack is to standardize and simplify the code without losing backward compatibility.
The main advantage of Android Jetpack is that the library is not bound to any particular version of Android system. Thanks to that developers are able to use new features in older systems. The Jetpack libraries use modern design patterns with cleaner and better separation of responsibilities thus providing greater testability. In addition, those libraries fully support Kotlin that allows more concise, robust and clean code. What is important is that all of those features greatly work together and are easy to integrate.
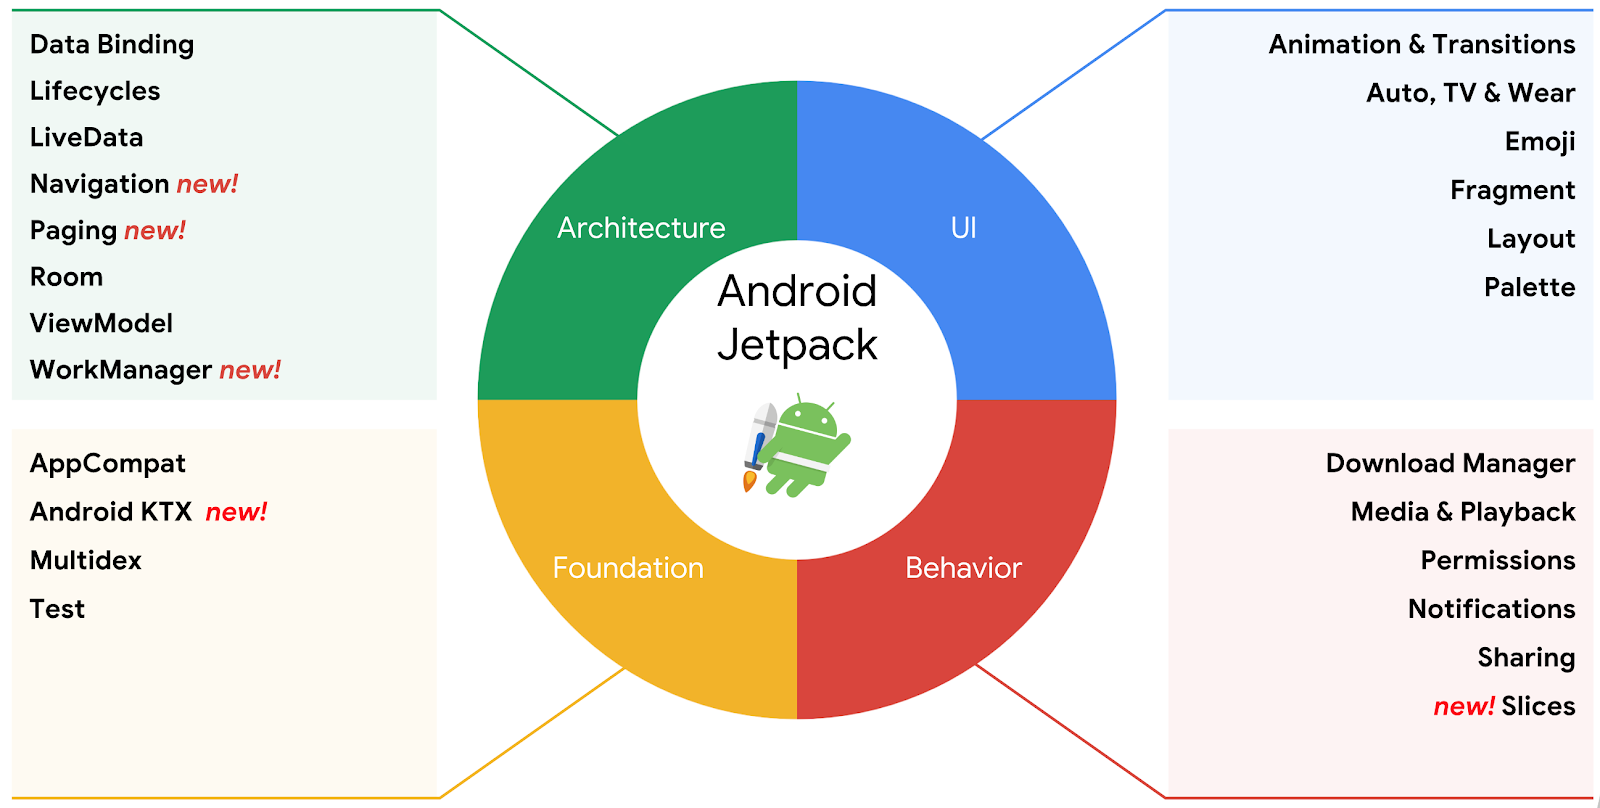 Android Jetpack Components. Source: Google
The release of Android Studio 3.2 gave us 5 new libraries:
- WorkManager - alpha release
- Navigation - alpha release
- Paging - stable release
- Slices - alpha release
- Android KTX (Kotlin Extensions) - alpha release
One of the most interesting components is the Navigation which we will cover here in greater detail.
Navigation
The Navigation Architecture is still in it's Alpha stage. That means that the functionality can change and there is a possibility that it can still contain some bugs. Despite that, Google has provided Android developers with the possibility to explore it's features. The early adopting developers can help and report all issues that they have to Google Issue Tracker.
The navigation is one of the main components of the mobile application which needs to be solved constantly across different applications. The Jetpack Navigation component allows us to: define the flow of the screens, automatically builds the correct up/back behavior, use deep linking, allows passing arguments in a safe way, deals with the back stack and it can declare transitions between screens. Additionally, with the Android Studio 3.2 Google introduced the Navigation Editor tool which can be used in conjunction with the Navigation Component to inspect and define the app navigation flow.
 Android Studio’s new Navigation Graph Editor - the sample app
Instead of manually creating the XML structure, we can use the graphical editor to generate it. The editor may look very similar for developers that were using iOS Xcode storyboards editor.
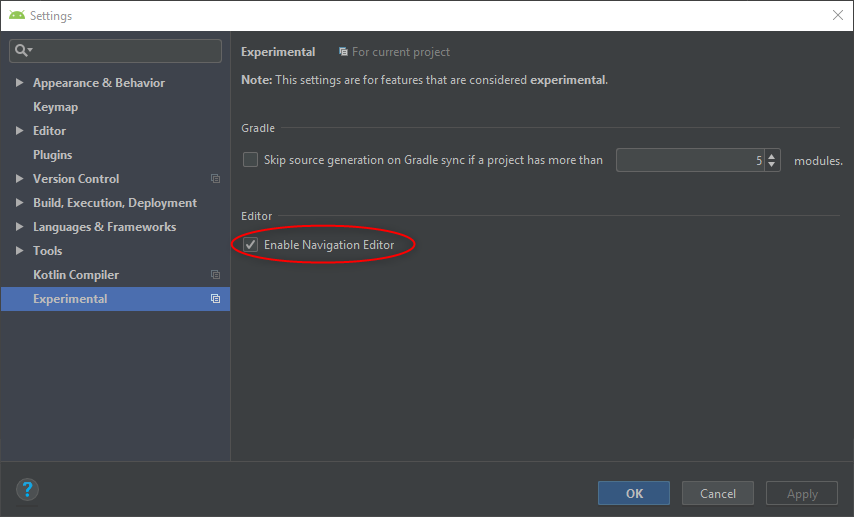
It's worth mentioning that the Navigation Editor is an experimental feature that is disabled by default. To enable it, we need to check that option under the Experimental tab in IDE Settings/Preferences.
Overview of Navigation
The basic elements that you need to implement to use the Navigation Component functionality are: Navigation Graph, NavHostFragment and NavController.
Navigation Graph is an XML resource that contains the app navigation.To define the entry point we need to set the startDestination attribute in the main <navigation> node.
The navigation paths between fragments are defined using the destination attribute placed in <action> node.
<?xml version="1.0" encoding="utf-8"?>
<navigation xmlns:app="http://schemas.android.com/apk/res-auto"
    xmlns:tools="http://schemas.android.com/tools"
    xmlns:android="http://schemas.android.com/apk/res/android"
    app:startDestination="@id/blankFragment">
    <fragment
        android:id="@+id/blankFragment"
        android:name="com.example.cashdog.cashdog.BlankFragment"
        android:label="fragment_blank"
        tools:layout="@layout/fragment_blank" >
        <action
            android:id="@+id/action_blankFragment_to_blankFragment2"
            app:destination="@id/blankFragment2" />
    </fragment>
    <fragment
        android:id="@+id/blankFragment2"
        android:name="com.example.cashdog.cashdog.BlankFragment2"
        android:label="fragment_blank_fragment2"
        tools:layout="@layout/fragment_blank_fragment2" />
</navigation>
In such an implementation, we define that we will navigate from blankFragment to blankFragment2.
The next step to setup the app navigation is to implement the NavHostFragment in XML view.
The NavHostFragment is a widget provided by the framework that you can add to your layout. After adding the NavHostFragment we need to link it to the Navigation Graph using the navGraph attribute.
We can see an example of the implementation below:
<?xml version="1.0" encoding="utf-8"?>
<android.support.constraint.ConstraintLayout
    xmlns:android="http://schemas.android.com/apk/res/android"
    xmlns:app="http://schemas.android.com/apk/res-auto"
    xmlns:tools="http://schemas.android.com/tools"
    android:layout_width="match_parent"
    android:layout_height="match_parent"
    tools:context=".MainActivity">
    <fragment
        android:layout_width="match_parent"
        android:layout_height="match_parent"
        android:id="@+id/my_nav_host_fragment"
        android:name="androidx.navigation.fragment.NavHostFragment"
        app:navGraph="@navigation/nav_graph"
        app:defaultNavHost="true"
        />
</android.support.constraint.ConstraintLayout>
The last step to finish setup of the Navigation Controller is to implement the NavController class. The class is used when performing the navigation between destinations. To fetch the proper instance of the NavController class we can use one of three static methods:
- NavHostFragment.findNavController(Fragment)
- Navigation.findNavController(Activity, @IdRes int viewId)
- Navigation.findNavController(View)
Having the instance of NavController we can navigate to specific destination using the navigate() method. As the parameter we can use id of the action or id of the destination as in example:
navController.navigate(R.id.actionId)
// or
navController.navigate(R.id.destinationId)
The pros of using the action id instead of the resource id of the destination is that we can associate transition with our navigation.
To sum up, you will use the NavController object to tell where you want to go or what specific path you want to take in your Navigation Graph. Then you will fetch the NavController instance and call a transition to the appropriate destination in the NavHostFragment.
If you want to learn more about the implementation of the Navigation Architecture Component you can visit the official android documentation site.
Principles of Navigation
At the end I would like to mention that if you are using Navigation Components for your navigation, you are adhering to the Principles of Navigation officially established by Google:
- The app should have a fixed starting destination.
- A stack is used to represent the navigation state of an app.
- The Navigation Up function never exits your app.
- Up and Back should function identical in all the other cases.
- Deep linking to a destination or navigating to the same destination should yield the same stack.
Generally the aim of all navigation within the application should be clear and consistent usage experience which the Navigation Components enable us to do.
Conclusion
The main point of Navigation Component is to help developers implement and manage app navigation faster and more efficiently. It reduces the boilerplate code written by automatically building the correct up/back behavior, supports deep linking, gives developers the mechanism for safely passing arguments and transitions. Such amount of features looks very promising and inviting to use.
The important question now is how the Navigation Component will be able to handle complex cases. Today, it is hard to predict such things but we will see how the Google developers will solve this. To add more, the Navigation Component is still in its alpha stage, containing a lot of bugs and the usage in production environments are heavily discouraged the Google. Fortunately for us, those issues are quickly addressed and more and more improvements are added. This is why I encourage you to experiment with the library and I am eagerly waiting for the stable release.